Olaf from Disney's "Frozen" Crochet Pattern!
By: Ashley Phillips (@thegingerbeast)
When I first saw "Frozen" in theaters, I instantly fell in love with Olaf. I mean seriously, who couldn't? That little guy made the entire movie. Of course, the first thing I did when I got home that night was search Ravelry and Pinterest for a pattern to make my own Olaf. I was pretty disappointed that all of the good patterns cost over $6. When you factor in the cost of materials, you might as well just spend the money for the plush toy at the Disney Store. I am not ashamed to admit that I am very cheap! So, I set about trying to make my own. Here's my first try:
.jpeg) |
| Hi, my name is Olaf and I like warm hugs! |
I'm very proud of myself for coming up with the pattern! And it only cost me $3 for materials! So obviously since this is my first pattern and I made up most of it in my head at work, please let me know if there are any issues or inconsistencies!
Olaf's body is worked entirely in one round, so this pattern seems long but I promise it is very easy!
Happy crocheting!
Materials:
- White yarn. I used one skein (364 yds, 7 oz) of the cheap "Craft smart" Value yarn for $2 at Michael's! It's not as soft as some yarns, but it worked out really well!
- A few yards of orange yarn for carrot nose
- US size H 5.0mm crochet hook, or whatever size your yarn calls for. No real gauge needed.
- Polyester fiberfill
- Tapestry needle
- Black and white felt
- Brown Pipe cleaners for head.
- Super glue.
- Scissors
Stitch Explanation:
- sc - single crochet
- st - stitch
- ch - chain
- inc - increase stitches by single crocheting twice into one space.
- dec - decrease stitches by inserting hook into stitch and pulling up a loop. With stitches on the hook, insert it again into the next stitch, pull up another loop and pull hook through all three loops. One decrease made.
- PM - place marker
- sl st - slip stitch
Olaf's Body!!
Round 1: With white yarn, make 6 sc in a magic circle. Instead of a magic circle, you could ch. 2 and complete 6 sc in the second ch from hook. (6)
Round 2: Inc around. PM. (12)
Round 3: (inc, sc in next sts) around. (18)
Round 4: (inc, sc in next 2 sts) around. (24)
Round 5: (inc, sc in next 3 sts) around. (30)
Note: Continue increasing around in that way for 13 rounds, until you have a circle that is 78 stitches across. For example, Round 6 would be (inc, sc in next 4 sts) around (36)…etc. The final round, Round 13, will be (inc, sc in next 11 sts) around (78).
Rounds 14-25: Single crochet around. (78)
Round 26: (dec, sc in next 11 sts) around.
Round 27: (dec, sc in next 10 sts) around.
Round 28: (dec, sc in next 9 sts) around.
Note: Continue decreasing around just like you were increasing before for 4 rounds. For example, the final Round 32 would be (dec, sc in next 5 sts) around. (36)
***Olaf's bottom half is all done (watch out for my butt!) Now we will start working on his "stomach", or middle area!***
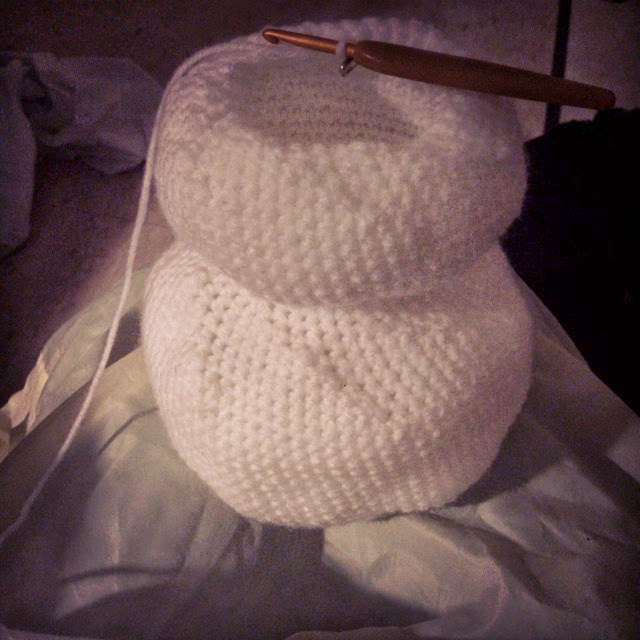 |
| This is what mine started to look like. (Sorry for the crappy picture, I was at work!) |
Round 33-34: sc around.
Round 35: (inc, sc in next 5 sts) around.
Rounds 36-38: Continue increasing around as above for 2 rounds until you reach (inc, sc in next 8 sts) around.
Rounds 39-44: sc around
Round 45: (dec, sc in next 8 sts) around.
Rounds 46-49: Continue decreasing around as above for 4 rounds until you reach (dec, sc in next 4 sts) around.
*Stuff body with fiberfill while you still have enough room, once you start his head he will be hard to stuff!
At this point, you can do what many children do at Build-A-Bear stores. I crocheted Olaf a tiny little heart, made a wish and stuffed it inside!*
Round 50: (dec, sc in next 3 sts) around.
Round 51: (dec, sc in next 2 sts) around.
***Olaf's stomach is done! Now we can work on his head!!***
Round 52-56: sc around.
Round 57: (inc, sc in next 2 sts) around.
Round 58: (inc, sc in next 3 sts) around.
Round 59-68: sc around.
Round 69: (inc, sc in next 4 sts) around.
Round 70: (inc, sc in next 5 sts) around.
Round 71: (inc, sc in next 6 sts) around.
Round 72-73: sc around.
Add more fiberfill to head, make sure you stuff so the head is shaped like an oval and not completely round.
Round 74: (dec, sc in next 6 sts) around.
Round 75: (dec, sc in next 5 sts) around.
Round 76: (dec, sc in next 4 sts) around.
Round 77: (dec, sc in next 3 sts) around.
Round 78: (dec, sc in next 2 sts) around.
Round 79-87: sc around.
Add more fiberfill, stretching the top part and shaping it more "oval" as you go.
Round 88: (dec, sc in next 5 sts) around.
Round 89: (dec, sc in next 4 sts) around.
Round 90: (dec, sc in next 3 sts) around.
Stuff with more fiberfill
Round 91: (dec, sc in next 2 sts) around.
Continue stuffing and shaping.
Round 92: Close with (dec, sc in next sc) around. Decrease a few more times until the head is closed. Cut yarn with a long tail and weave in ends.
Olaf's Carrot Nose:
*Stuff with fiberfill as you go, remember to add extra to the middle of the carrot since Olaf's nose is a little misshapen!**
Round 1: Magic ring, 6 sc. PM (6)
Round 2: inc around. (12)
Round 3: (sc, inc) around (18)
Rounds 4-7 sc in each st. (18)
Round 8: dec once, sc around (17)
Rounds 9-10: sc around (17)
Round 11: dec once, sc around (16)
Round 12: sc around (16)
Round 13: dec once, sc around (15)
Round 14: sc around (15)
Round 15: dec once, sc around (14)
Round 16: sc around (14)
Round 17: dec once, sc around (13)
Round 18: dec once, sc around (12)
Round 19: dec once, sc around (11)
Round 20: dec once, sc around (10)
Round 21: sc, dec around. sc in last st. (7)
Round 22: sc 2, dec, sc, dec (5)
Once you are done stuffing, close the hole and cut the yarn with a long tail to sew on to Olaf's face.
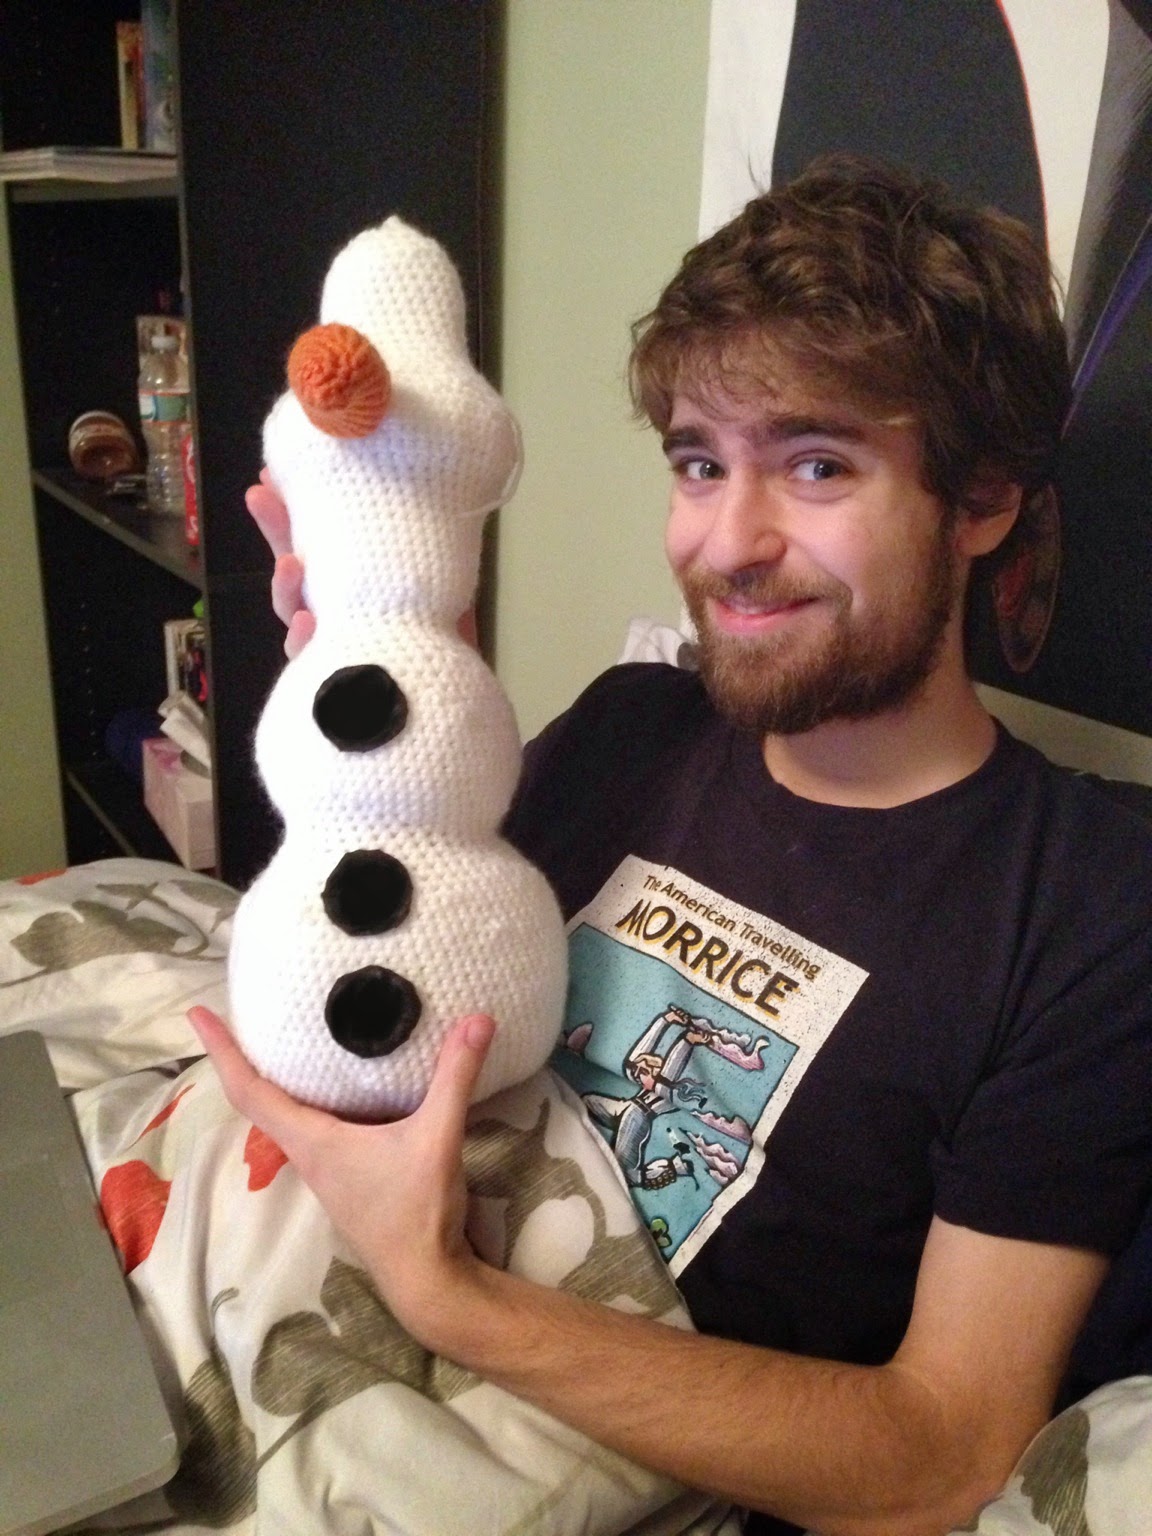 |
| Nathaniel helping me cut out Olaf's "buttons"! |
Assembly:
1. Cut three round circles out of black felt and place onto Olaf with super glue. One circle on his middle and two on his bottom half.
2. Sew Olaf's nose on to the ridge in the middle of his face, that gives him a more uniform appearance. Make sure the nose is over-stuffed so it is slightly crooked and points downward.
3. Trace or draw a mouth onto black felt and glue onto Olaf's face. Cut out a rectangle from the white felt for his teeth and glue that onto the top of the mouth.
4. Cut out ovals from the white felt for his eyes and tiny circles from the black felt for pupils. Glue these onto the top of his face. Cut and glue two tiny slivers of black felt for his eyebrows.
 |
| During assembly! |
5. Trim down a few pipe cleaners and stick them on Olaf's head for "hair. For his hands, cut a pipe cleaner into two small pieces and wrap around a larger piece of pipe cleaner for "fingers".
And you're done! Enjoy your Olaf! If you are making this for a small child, I would suggest leaving the pipe cleaners out so they don't poke themselves ;)
Please comment on my blog at thegingerbeast.blogspot.com with any questions, comments, or reviews! Thanks for reading!
This pattern is FREE and cannot be replicated for sale. All rights to Olaf and any "Frozen" character belong to Disney.
.jpeg)


.jpeg&container=blogger&gadget=a&rewriteMime=image%2F*)


.jpeg)